Zendesk Tip#13 - Restricting Satisfaction Surveys by Date
Introduction
One of Zendesk Support’s most popular features is the built-in customer satisfaction survey. Customer satisfaction allows you to track how well your agents and customer service organization as a whole are performing on a ticket by ticket basis.
However, when customizing your process, you’ll want to think about different situations, and what will work best for both you and your customers.
Are you more concerned about customers receiving too many emails? Consider combining customer satisfaction with another email. But in this scenario, customer satisfaction may not get the attention (or response) if combined with other information.
Also consider the case that a ticket is inadvertently marked as solved, or is solved before the issue is actually resolved for the customer. Sending out the survey in combination could actually result in more negative ratings. Using an automation instead, allows a period of time to pass, during which a customer could choose to reopen his or her ticket.
If your response cycles with support are typically shorter (e.g. most tickets take 5 minutes to answer), you may want to actually reduce the amount of time you wait before surveying customers. If your response cycles are measured in hours or days, 24 hours might be adequate. Timing is everything, and a perfectly timed customer satisfaction survey can truly help your response rate.
Customers with many tickets can become overwhelmed with satisfaction surveys. This frustrates the customer and can lead to invalid satisfaction metrics. This article describes how to suppress a customer's notifications if a recent survey was submitted.
Also, if you want to improve your CSAT, I have another great read for you here.
Requirements
First of all, you will need to create a new user field which will record the last date when your customer has submitted a satisfaction survey.
Secondly, an HTTP target is required to send the date to the user field mentioned above.
After these two have been created, in order to suppress notifications, a new automation which offers satisfaction without a notification will have to be created and standard automation will have to be changed to fire the HTTP target to register the date on the user field.
⚠️ Automation order will have to be changed so that the newly automation created fires before the standard one created by the system when satisfaction surveys where activated in Zendesk.
How To
Here are the steps required to implement this solution.
Create the custom User Field

Access the admin menu from the mighty clog wheel
Under MANAGE section, go to User Fields
Drag a Date field type to the active fields area to create a new field
Edit the field details as shown in the picture below
⚠️ Make sure you note down the Field key “last_satisfaction_date” and use it accordingly in following steps.

Create the HTTP Target

Within Admin menu, Locate account the SETTINGS section
Open Extensions
Add a new target -> select HTTP target

Configure the HTTP target

Title
PUT API/Users/Ticket Requester ID/Last Satisfaction DateUrl
https://your_url.zendesk.com/api/v2/users/{{ticket.requester.id}}.jsonMethod
PUTContent type
JSONBasic Authentication
Check the box for Enabled
Add an admin user email and password
⚠️Make sure your account is configured for API Access!
Configuring your account for API Access

In order to authenticate for API access you need to enable Password access or Token access from Admin/Channels/API/Zendesk API
If you choose to authenticate the API call with password access, making sure the this type of access is enabled will ensure successful authentication.
In case you prefer to use Token access, enable the option and create a token, copy it and store it securely.
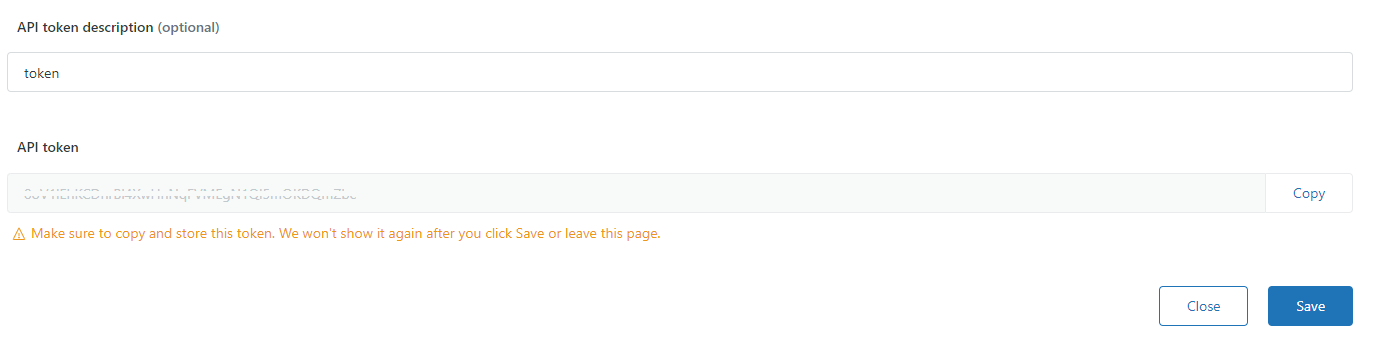
Now go back to your HTTP target and add your your.adminemail@domain.com/token for user and the token for password. That's it!

Create a new customer satisfaction automation
Now that we have all prerequisites in place, we can start automating the process.
Go to Admin/Business Rules/Automations
Locate the default automation Request customer satisfaction rating (System Automation) and clone it

Rename the cloned automation to Customer satisfaction rating (Notification sent recently).
Specify your conditions

The automation will fire if the ticket is solved and has been moved to this status in the last 48 hours, satisfaction survey was not offered for this particular ticket, and user has not received any surveys during the last 14 days.
Next, define the action triggered if conditions are met and allow the customer to rate the experience. This action will also stop any other surveys to be dispatched for this particular ticket.
Update the standard automation
As you have observed, in the automation created above, we have used the user field created in the requirements section to validate if ticket requester has received any surveys in the last 14 days. Now, we need to alter the standard automation to update the respective field with the date when the satisfaction survey was sent.
Under Admin/Business Rules/Automations, open the standard automation Request customer satisfaction rating (system automation) and add a new action to notify target where you will have to select the HTTP target created earlier - PUT API/Users/Ticket Requester ID/Last Satisfaction Date. Then paste the code below in the JSON body:
{"user":{"id":{{ticket.requester.id}},"user_fields": {"last_satisfaction_date" : "{{ 'now' | date: '%Y-%m-%d' }}"}}}⚠️ Make sure the field key is last_satisfaction_date!

Order your automations correctly
Let's do a quick recap on the automations to understand why ordering is important.
We have created Customer satisfaction rating (Notification sent recently) which based on the condition specified will update (or not) Ticket: Satisfaction with offered to requester.
⚠️This automation will have to sit in front of the standard one as it won;t send any notification to the customer, will simply decide if respective field is updated or not so that Request customer satisfaction rating (system automation) will not fire for that ticket.
If conditions are met and first automation will not update satisfaction to offered, second one will update the Last Satisfaction Date field for the user and dispatch the email.
So, the correct ordering is:
Customer satisfaction rating (Notification sent recently)
Request customer satisfaction rating (system automation)
⚠️ Also, be careful how you set the conditions on these two automations both will have to have similar conditions to work in sync. Otherwise, you risk to have the second one firing first and notifications are still sent for each ticket.
For example, a common mistake is to set Ticket hours since solved on the first automation to 48 but on the second one to 24. In this case, when automations will run your first one will not fire but the second will.
Read another tip about Zendesk setup here: https://www.dominiccx.com/blog/zendesk-tip12-how-to-add-a-tag-to-a-user-with-an-incoming-ticket
IF YOU WISH FOR MORE CX GOODIES, PLEASE LEAVE ME YOUR EMAIL.